hitOrMiss — a Phaser tutorial Pt.1

Very recently, I was working on a Phaser game project and I kept looking for a tutorial about the effect of “flickering” when your avatar gets “hit” (if you have ever played Super Mario, you know what I am talking about). In a time crunch, I found a workaround (check out the game and touch a jellyfish) that was good for the moment but I knew I wanted to dig deeper and find a better solution. If you have been on a similar search before and have stumbled upon my article: you have arrived. In this tutorial series we will cover the following topics:
Pt. 1 (this is here)
- use tweens to add flash effect for avatar
- add a countdown with phaser time event
- create a sprite animation to let the avatar shoot back at the birds
- debug hit area and how to adjust them
Pt. 3 — soon to come —
- transition between Scenes (Intro and a GameOver, and restart the game)
- look at some simple tricks to make it mobile accessible
- deploy with AWS Amplify
If you follow along, you will end up with a silly game like this, but I invite you to use the knowledge for your own vision.
But before we get to code, we have to set up some stuff. Let’s start by looking through the code I will be working with. You can head over to my GitHub and get the same code base by cloning this repo (the README will help you set it up on your local machine). If you want to jump ahead, scroll down to the next section and dive right in.
Once all is ready, your browser should show you the MainScene. You can move your avatar left and right using the arrow keys and you’ll see a bird flying back and forth dropping sh*ts.

Great, let’s look through our files:

We have a public folder that contains all of our assets, our index.html file and our bundle.js (that’s what where webpack serves up all our Javascript files).
In our server folder, we have our index.js file where we create and start up our server. We connect it to the port of our choice (in this case, 8080). I set this up in case one day I want to add a scoreboard.
Now, let’s head to the folder we will spend most of our time in during this tutorial: the src folder.
Here we have a few subfolders to organize our game. We have a config folder (with a Phaser config file), an entities folder (which holds a file for each sprite we use in the game), and the scenes folder with the MainScene.js. This is where we will create all our additional scenes later. Lastly, there is an index.js file. Let’s look at that one a little closer.

So here is where the magic starts. We import Phaser and the config file from our config folder. Then, we create a Phaser game class component and pass the config file with all our configurations to it. Underneath, we will add all of our scenes (right now, it is only the MainScene). And right after we tell the component which scene to show when we start a new game. Lastly, window.onload will create the game once the window (our browser) has loaded.
So let’s see what we serve up from our MainScene. On top, we import all of our entities (we will look at those files in time). The MainScene then gets created as a Phaser.Scene. The string passed into the super() needs to be the same string that you used on the index.js file to add and start the scene. Ok.

Next up: the three functions that make up a Phaser scene:
preload(){} //loads all pics, sounds etc.. to scene (runs once)
create(){} //creates all things (runs once)
update(){} //updates stuff throughout the game (runs all the time)
In the preload function, all the asset files are loaded from the assets folder into the scene. Depending on the file type, you will load them with different methods:
this.load.image //loads an image (no animation)
this.load.spritesheet //a file with multiple pics (for animation)
If you head to the browser, you see that the bird (spritesheet) moves its wings while the birdsh*t (image) just falls straight down. For spritesheets, you have to define how the frames should be “cut” and shown.

In the create function, we finally get some action. Here we add all our assets to the scene so that they become visible:

We add the image by using the same string given in the preload function. We set our world bounds and then we call the createAvatar function. createAvatar is not a built-in function and we will take a look at it a little later. For now, let’s move on, and have a look at the lines right underneath. Here, we connect the keyboard keys “arrow left” and “arrow right” to this.cursors (where “this” refers to the current scene aka MainScene).
this.cursors.left -> is connected to the "LEFT" key
this.cursors.right -> is connected to the "RIGHT" key
Next, we attach the birdCount variable to the scene so that we can access it later when we update the number of birds shot by the avatar. Then we add some text to the scene: a timer (the 00:00 at the top of the scene), and the score of sh*ts and birds. Further, we have to create a bird group so that we have a place to put all the birds we will add later and a sh*ts group so we can keep track of them as well. Finally, we create the first bird. Now I don’t want each bird to sh*t at the same time. For this occasion, Phaser has a super helpful method to get a random number:
Phaser.Math.Between(min, max)
//will give a random number between min and max every time called
//goodbye Math.random() * 100 + num
For now this all might seem a little redundant and I would agree BUT I want to add more birds as the game progresses and we will see in a little bit how this set up will really come in handy.
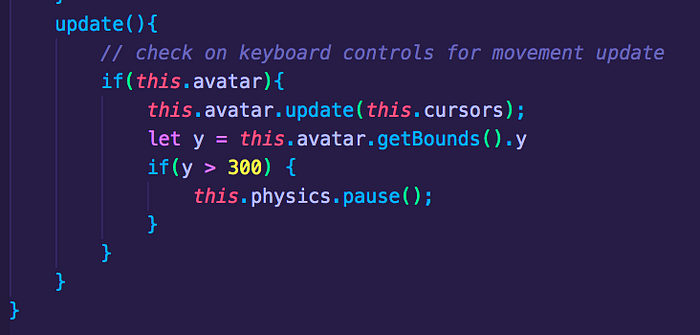
Ok, next, the update function of a Phaser scene.

Here we say, if there is an avatar on the scene, we will update the avatar position using the cursors as indicator.
Now let’s head to the createAvatar function to see how this all works out.

The createAvatar function takes in the current scene and the coordinate points (x, y) where the avatar will appear. It will then call the function that creates the animations for the avatar. Again we are using the “this” context of the scene and the string associated with the avatar spritesheet (see preload function). Then, we append a new instance of the avatar to the scene object. Underneath, we define what animation will be used right at the start. We create a hitCount and we make sure sh*ts do not push the avatar off scene. If we take a quick look at the Avatar.js file in the entities folder we see how the new Avatar gets set up exactly.

As you see, the Avatar class constructor takes in the scene (“this” context of the MainScene), the x and y coordinates and the sprite name to connect to the picture you want to use. Then, we add the avatar sprite to the scene. We say “yes this avatar should behave accordingly to the physics of the world (scene) and we do not want the avatar to be able to walk off scene (setWorldBounds). Lastly, we attach a variable faceRight to the avatar to keep track of the direction the sprite is facing. The interesting part here is the update function: Remember when we call it in the MainScene with the cursors as the argument? Here is where this.avatar.update(this.cursors) gets resolved. Cursors will get passed into the avatar’s own updateMovement function where we will check, if we have a movement associated with the pressed key. If so, we will call on the corresponding animation and update the x and y position of the avatar. Want to see where the animations come from? Check out the createAvatarAnimations function in the MainScene:

You see that each animation is created with a key that has a string value describing the movement direction (you can choose whatever you want here, but I keep it simple). In other words: keys and animation connect to the same string. The tricky part is to get the right frames for each movement. If you download a sprite sheet you might be lucky and get its frame size in the file information, but at times you have to do the calculations yourself. Also remember that the frames start at index 0. The frameRate determines the rate of playback in frames per second (default is 24 when duration is null). And repeat? Well, that’s how many playbacks you want (-1 = forever).
I will leave it at that for now. You can look around yourself and hit me with questions anytime.
As you know, my first goal is to implement this “flash” effect when the avatar gets hit by a bird sh*t. For this I will use tweens. Tweens are classes used to manipulate object properties, and here is how I used it for that special case:

Tweens have A LOT of optional parameters to chose from. Here are the ones I used:
target will take the object (or array of objects) you want to manipulate with the tween. This is the only mandatory argument to create a tween.
duration takes a number as value which dictates the duration of the tween in milliseconds and repeat defines how many times you want this effect to run (-1 = forever)
ease accepts a string associated with built-in functions to chose from and you have quite a few options here. This defines the way of transition from one state of the chosen object property to another (in my case I use alpha to manipulate the coloring of the sprite and yoyo to change it right back again to the original color). If you set yoyo to “true” it means that whatever the starting state was (that could be position, color..) it will return back to that state. Lastly, I set paused to “true” so the tween does not play right away. If you comment out the paused value and head over to the browser you will see the avatar flash 5 times (which is the repeat value) right when the game loads.
Ok so now let’s create a collision between the sh*t and the avatar. Collider is a property of the scene.physics and you can add one like this:

The collider will use arguments one and two as the objects to check for collision with each other (if you have a sprite and a group of objects passed in as arguments, the sprite always comes first). The third argument is the function you want to run if the objects collide, the fourth is an optional second function to run after the first and the fifth argument is the scope in which you want to run the callbacks (here, the MainScene). So now, let’s write up the onCollision function at the bottom of our file.

The onCollision function will always take the two colliding object as the first and second arguments. Now let’s walk though all the things that need to happen when the avatar gets hit. So first I want to update the hitCount of the avatar (remember we create that key on the avatar when we call the createAvatar function). Then, I want to update the text on the game scene with the new hitCount. I will un-pause the tween that is attached to the avatar.flash key with the tweens built-in method .play() an lastly, I want to destroy that bird sh*t using .destroy(), also a built-in method to clean up unused objects on the scene. If we head to the browser now, we should have two things worked out: the avatar should flash and the hit count should increase each time the avatar gets hit by a sh*t. (If it’s not working, make sure the collider is added after you created at least one sh*t, aka after the createBird function is called).
So now we only have one problem: as we have the game set up, we will get shat on for all eternity..not so much fun, right? Let’ s add a quick if statement to the onCollision function to set an end to the game:

So now it will check if the hitCount is 2 and if so, it will pause the scene. In any other case, it will still call the tween on the avatar. This does the job, but it’s not really exiting. Let’s add another tween to make the end of the game a little more dramatic:

To look at some other tween options here I use the props key to pass custom values (this time I want to manipulate the y-coordinate). Basically I say “move my avatar to the y-coordinate 170 in a linear movement and then back to where it was originally (yoyo: true). This should happen within 500 milliseconds”.
Now let’s go back to our onCollision function to trigger the tween when the avatar has been hit too many times and the game is over.
avatar.die.play()But for this to work we have to add a few more lines. Here is what should happen: When the game is over the avatar should lift up and then fall though the ground of the game scene. To make that possible, we have to remove the world bounds from the avatar when the game is over and give it a downward velocity (on the y-axis). After the avatar has left the scene, we pause the game. Here is how you can do all of that:

Ok so now what about the scene.pause? I chose to make use of the update function which checks for changes/input on the scene all of the time. Since we already have the avatar added to the update function this is a quick fix. We say once the avatar is lower than the scene’s bounds, we call scene.pause. Now that we know it’s working, let’s set the hitCount to 10 rather than 2.
Last thing for now: Let’s add a countdown.
As you can see in the create function, we have already set up a text for the timer, but it shows a static 00:00. First, add a variable on the scene right and set it to a number value (your countdown time in seconds).
this.countdown = 150;Next, we will have to format the seconds to min:sec. Let’s write up a function called formatTime that will do just that. The function will take in seconds (the countdown value) and will spit out a string with minutes and seconds. Here is what I did:
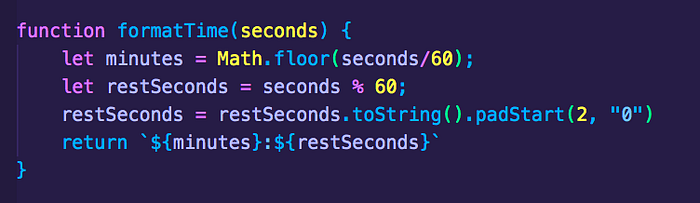
The minutes are simply the seconds divided by 60 (60 seconds is a minute) and rounded down to the full number. Next, we take the modulo of 60 (that gives us the remainder when the seconds are divided by 60). We use the padStart method to ensure it will always be two digits long (if there are no two digits left then we add a zero as the first digit) — done.
Let’s swap the 00:00 in the timer text with a formatTime function call and pass the countdown value as the argument.

Lastly, we have to create a timed function call that will subtract one every second from the countdown. Phaser has a built-in class called Timer.Event for delayed function calls that can be looped if needed. Let’s add that to the create function right after the countdown variable:

addEvent can take many arguments, but we are using only a few: delay will take milliseconds as value for how long to wait before the provided callback function is executed. callbackScope takes the scope in which the function will be called (this === MainScene) and loop if set to true will keep repeating the delayed function call.
So let’s define the onTime function to get the countdown going.

So far pretty straight forward. Phaser’s setText will update the existing text with the string passed to it. The only problem: the timer will never stop. So let’s fix that by ending the game if the countdown value is 0.

Now, when you go refresh your browser, you should have a running countdown, a working bird sh*t count, a tween that gets triggered when the avatar gets hit by sh*t and one that gets triggered when the game is over.
This wraps up the first part of this tutorial series. In the following post we will add some animation to the avatar (so the avatar can shoot back at the birds). We will also look at how to debug the “hit areas” of sprites (aka how to adjust the rectangle size of the objects colliding). Stay tuned and don’t by shy if you have any question or comments ❤