hitOrMiss — a Phaser tutorial Pt.2

Welcome to part two of this tutorial series where we explore more Phaser functionality and create a game like this one. In Pt. 1, we walked through the setup, talked about tweens and created a countdown timer for the game.
Let’s get going! First we’ll create a new animation so the avatar can shoot at the birds and we’ll also write the logic for what happens when a bird gets shot. At the end, we will have a look at how to debug some common collision problems.
If we have a look at the spritesheet of the avatar (stored in the public folder under assets) we see that it contains a series of picture frames where the avatar fires a gun facing right, and another set where the avatar fires facing left. Let’s use these frames for the new animations!

First, we have to know the indices of the frame we want to use. In Pt. 1, I quickly talked about how to count the frames, now let’s look at it in more detail:
It is vital to know the size of each frame so that you know how many frames to count for each row. Taking a quick look into the preload function, we see how to set the frame size manually in px.

Now we have to count the frames by index so that we can tell the animation function which frames to use. Notice that we even count the frames without animation pictures!

Now let’s code up a animation, we’ll start with “shoot right”. For that, we’ll head to the already existing animations at the bottom of the MainScene.js file and add it to the same function, createAvatarAnimations.

Animations is a singleton class, meaning that there can be only one instance (think of it as a single object) in a game. We can access the individual animations by using the related key created with each new animation. The create method takes in the configurations for the new animations and has a bunch of optional parameters. If you decrease the frameRate, you will see the frames switch more slowly, increase it, and they switch faster. The animation should repeat once for each time triggered (in our case, that means only one shot per key stroke). I use generateFrameNumbers to set the animation picture frames. Here, I pass in the key of the desired spritesheet (the string I assigned to the file when loading it in the preload function) as well as the start and end frame according to my spritesheet’s frame indices.
Next, we assign a keyboard key to trigger the animation in the Avatar.js file, just like we did for the other animations. We add the following to the updateMovement function:

Lastly, to make this actually work, we have to add the Up key to our current keyboard set. Let’s head back to the MainScene to do this.

So now, if we head to the browser, we will be able to trigger the “shoot right” animation when we press the Up arrow on our keyboard.
Here, a quick side note about assigning individual keys to the game’s scene: If you are using arrow keys, there is a more elegant way to do it:

createCursorKeys adds event listeners to Up, Down, Left, Right, Space Bar and Shift.
Let’s get back to our animations. The problem we have now is if the avatar faces left, it will jump to face right as soon as we press the Up arrow and therefore trigger the “shoot right” animation. But wouldn’t it be nice if the avatar would stay in the direction that it’s facing already? So let’s create a second animation for “shoot left” and update the updateMovement logic to trigger the correct animation, dependent on the direction the avatar is facing.


Next, we’ll have to create the bullet to shoot at the birds and add a collision between the bullet and the bird. This is very similar to the collision between the bird sh*ts and the avatar. Two things to keep in mind: the bird needs to die and disappear when getting shot, and the bullet needs to be created on the cursors.up.isDown.
The steps to accomplish this are the following:
- Load the picture you want to use for the bullet to the scene’s preload function.
- Create a createBullet function that can be called when arrow Up is down.
- Create a collision between the bird and the bullet, as well as the callback function that runs when the collision happens (aka the bird gets hit by the bullet).
First up, let’s load the bullet to the scene:

As for any asset we are planning to use multiple times, let’s create a group on the scene to which we can add them later:

Next, let’s add a file to the entities folder called Bullet.js where we can add all the configurations for each bullet created.

Ok, let’s talk through this file in detail:
First, we create a class called Bullet that extends from Phaser.Physics.Arcade.Sprite class. We pass in the MainScene (referred to here as “scene”), the x and y coordinates where the bullet should appear and the key connected to the .png file we want to use.
After, we add the instance to the scene and enable the game physics for this object. Since we want the bullets to move upwards, we setVelocityY to a negative number (to make the bullet slower/faster, you decrease/increase the value). In the next section, we create all the logic around the moment when the bullet collides with the world bounds (or disappears from the scene). Any bullet that leaves the scene does not need to exist anymore, so we have to set up a few things:
First we tell the game we want this object’s body to collide with the world bounds. We also want to be notified when the body collides with the “worldbounds” so we can add an event listener that is triggered by bodies colliding in that moment. No typo here: bod-i-e-s! If you console.log(body.gameObject) within that function you will see that it can be the bird flying out of the scene or a sh*it colliding with the bottom of the scene or the bullet (which is what we are looking for in this instance). So we have to create a conditional statement to make sure our logic only runs whet it is actually a bullet.
Let’s head back to the MainScene.js and create the function createBullet that will create a new instance of the Bullet class when invoked. createBullet should also add the new instance to the bullets group we created earlier. I hard-coded the x and y coordinates for now, so that we can check if we can get them to show up in the browser.

So now the question is where to call createBullet. We could import the function into the Avatar.js file and update the updateMovement function or –and this is what I chose to do – use the update function in MainScene directly.

We simply add a conditional that says, if the Up arrow is pressed, create a new bullet, and we pass the MainScene as the only argument to the function. Great. Let’s head over to the browser and see what we get.
Wait what is this??!! Now we can see just how many times the update function runs when we press the Up arrow key. Safe to say: it runs more than once. So how do we control the frequency of the createBullet function?
Well, let’s add another conditional to check how much time has passed since the last bullet was fired.
First, we add a new variable to the scene, let’s call it nextBulletAt and set the value to 0. The variable needs to be declared outside the function because we will update the value within the function over time. So then, inside createBullet, we will use a Phaser’s now method to give us the current game time in milliseconds. We will use scene.time.now to stop the createBullet function from creating more than one bullet per key stroke. Then, we can add the conditional to say if the nextBulletAt is greater than the scene.time.now then just return. Otherwise, we will assign the current time plus our choice of delay to the nextBulletAt variable and go ahead and create a bullet.

If we head back to the browser, we will see that the bullets are now created at a slower pace. The only problem we are still facing is that the bullets always show up at the exact same place. If the avatar moves, we have to update the coordinates passed into the new Bullet constructor. Luckily, each Phaser object has its coordinates as keys available to us at all times. Let’s update createBullet and pass in the coordinates as parameters.
Then, adjust the createBullet function call in the update function accordingly with this.avatar.x and this.avatar.y.

The last thing to do is to add some additional pixels to the position (x, y) so that it will look like the bullet shoots out of the gun and not the avatar itself. This is a little guessing game and we will have to either use an if statement or a ternary operator for the x coordinate since it will change depending on the avatar facingRight or not.

Next up, we will finally add the collision between the bullet and the bird, and create the destruction of the bird. Let’s do this underneath the collision of the avatar and the sh*t.

Then, let’s head down to the onCollision function and define the onBirdHit function right underneath. Here is what the function needs to do:
- Destroy the bullet
- Destroy the bird
- Add one to the birdCount that we already declared earlier
- Update the text that is displayed in the browser with the updated count
Here is what the function should look like.

In the game that is deployed and ready to play, I added a few things to this function to make the game more challenging and fun.
I added an animation when the bird getting hit (you can find the file in the assets folder labeled explosion.png) and each time a bird gets hit 2 additional birds are created. Feel free to add that or some other things to your game :). → Check out the finished game or the deployed code
The last thing I want to tackle in this part of the tutorial: hit areas.
If you use Arcade.Physics, the hit area you will use for collision of any sprite will be either a box or circle. Now, if we change the size of the image seen in the browser (and that happens pretty often) there are a few things to be aware of.
To start this journey, let’s go to the config.js file and change the debug property value from false to true.

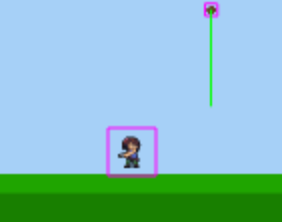
By doing so, we are able to see the hit areas and directions in the browser. Let’s go and see!

In our set up, we have already been scaling the sprite’s box using setSize, which takes a width and a height as the two arguments and adjusts the box around the sprite. To see what I am talk about, let’s see how the avatar hit area would look without the setSize.

So here we see how big the hit area box is in comparison with the avatar itself. As you can see, the sh*t falling down is colliding with the hit area, but not with the avatar!
What is important to understand is the difference between setScale and setSize.
Using setScale changes the size of the sprite but does not change the size of the box defining the hit area of the sprite.

Using setSize changes the size of the hit area box and not the size of the sprite itself!
After everything is set in the right size and scale, we can set the debug property in the config file back to false and the debug view will be gone again.
I will leave you with this and pick it back up in the third and last part of this Phaser deep dive. We will create an introduction scene with the instructions and a “game over” scene that will have the “start new game” button. Lastly, we will look at how to make the app mobile friendlier and talk about deployment. Stay tuned, and don’t by shy if you have any questions or comments ❤.